The concept of a Bastion server isn’t new, some may know it as a “jump box.” This article explains the advantages it offers and how easy it is to implement within the Azure platform to secure RDP/SSH connectivity for accessing VMs in Azure.
While many IT administrators and operators already use this service, numerous IT teams among the clients and companies I work with are still not using it for secure access and management of virtual machines in Azure from the internet.
Azure Bastion is a managed service platform in Azure that allows secure RDP and SSH to Virtual Machines within a virtual network (deployed in a separate subnet) and is designed to protect all workloads in IaaS mode.
A fundamental feature of Azure Bastion is that it offers agentless access to VMs through the Azure portal without the need to install additional software or agents. Simply open your browser to access your VMs.
To summarize, the main advantages are as follows:
– We can manage and monitor active remote connections.
– We will use an HTML5 browser to connect via SSL to our VMs
– Offers protection against attacks and vulnerabilities
– Avoid using public IPs in our Azure VMs (connect via private IP)
– Improve security score in Azure Security Center
– Secure remote access to perform RDP and SSH to our VMs
– Only communications from the Azure Portal and port 443 are allowed
– Deploying Bastion from Azure Portal takes 1 or 2 minutes
Architecture overview
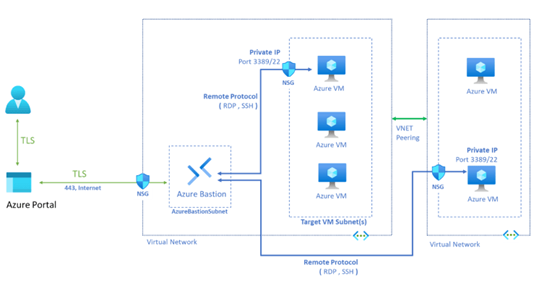
In terms of architecture, Azure Bastion is deployed in a subnet called “AzureBastionSubnet” within a VNET, acting as a single entry point to the rest of the virtual machines. It also allows access to other machines in different VNETs through peering.

Note: An important point to keep in mind is that we only need one Azure Bastion, for example, in our “hub” or “central” VNET, to perform peering with the rest of the VNETs. It is not necessary to implement an Azure Bastion for each VNET, except in specific scenarios or environments that require it for corporate reasons, especially in multinational companies.
Azure Bastion Configuration
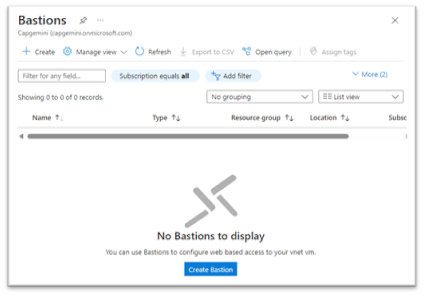
The easiest and fastest way to deploy and configure Azure Bastion is directly from the Azure Portal. Search for Bastions, click on the Create Bastion button, and follow the configuration steps provided in the wizard.

Obviously, it’s always advisable to create the resources using ARM or Terraform templates but for test scenarios, PoCs, pilots, developments, etc. it’s an option that we should consider if we have a short time in our project and work safely.
Azure Bastion Pricing
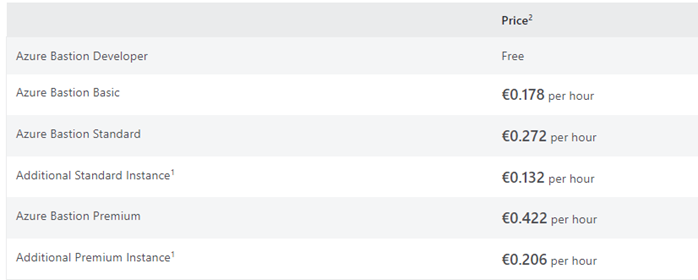
Using Azure Bastion is more cost-effective than implementing and maintaining your own jumpbox. A fixed hourly rate is charged, plus outbound data transfer charges. Azure Bastion offers a free tier for developers and charges an hourly rate based on the selected pricing tier. The pricing at the time of writing this article is as follows.

Note: Azure Bastion is billed hourly from the moment the resource is deployed until it is deleted, regardless of outbound data usage. The hourly pricing is based on the selected SKU, the number of scale units configured, and data transfer rates.
Ref: https://azure.microsoft.com/en-us/pricing/details/azure-bastion
Conclusion
Azure Bastion offers a more secure, easier-to-manage, and cost-effective solution compared to a traditional jumpbox, simplifying remote access to Azure virtual machines.
References
Azure Bastion Product: Azure Bastion Products | Microsoft Azure
Azure Bastion documentation: Azure Bastion documentation | Microsoft Learn
Azure Bastion overview: Acerca de Azure Bastion | Microsoft Learn

 English | EN