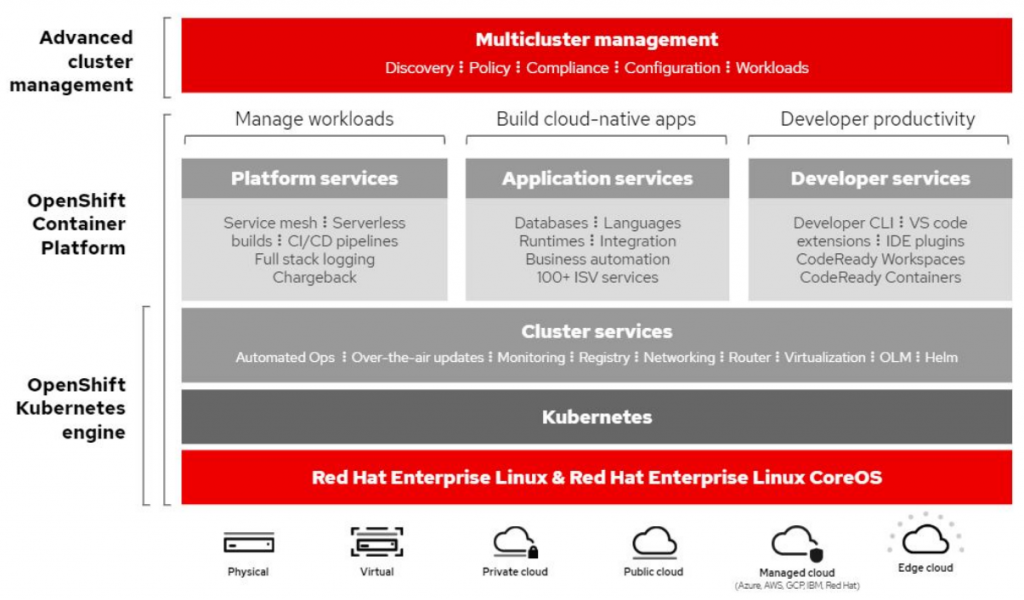
With $34 Bn acquisition of RedHat by IBM, RedHat is at the center with No 1 Linux operating system, RHEL, and the leading hybrid cloud platform OpenShift.
This blog provides an overview of OpenShift, I will try to answer the below queries:
- What is OpenShift?
- Quick ways of installing OpenShift
What is OpenShift
OpenShift is a platform that allows you to run containerized applications and workloads and is powered by Kubernetes. OpenShift can run on bare-metal resources in on-prem or it can be run on virtualized resources for example public cloud. OpenShift is kind of a Façade built on top of Kubernetes. Managing the complete cluster which contains multiple nodes and pods becomes much easier with OpenShift, it provides a UI and a CLI which makes things simpler by abstracting the complexity.
Learning, deploying containers on Kubernetes is challenging and the learning curve is huge, this has been made easy with OpenShift. You can login to https://www.openshift.com/try and try it out for free on various different flavors offered.
Red Hat OpenShift includes what you need for hybrid cloud, enterprise container, and Kubernetes development and deployments. It includes an enterprise-grade Linux operating system, container runtime, networking, monitoring, container registry, authentication, and authorization solutions. These components are tested together for unified operations on a complete Kubernetes platform spanning every cloud.

How to quickly get started with OpenShift Installation
OpenShift offers two ways of installation depending upon the Infrastructure that you choose from, which can be public cloud, vmware, bare metal details present here. For the purpose of this blog, I have chosen Azure as the target platform and Linux as the OS for downloading the installer and executing the commands.
- Installer Provisioned
- User Provisioned
Guidance on the minimum footprint for an OpenShift Container platform can be found in the below link:
Installer Provisioned
With Installer provisioned approach you can download the installer from install location and follow the below steps to get a running cluster:
There are two installers, one is a client installer which basically is a CLI “oc” which helps you query the cluster once the cluster has been provisioned. People with Kubernetes exposure, this is like “kubectl”. The second installer is “openshift-install” which is a CLI used for the OpenShift installation.
Link to Installer provisioned prerequisites helps you with setting up the ground required. Few notes based on my experience:
- Create an account at RedHat and navigate to Installer provisioned
- Read the Azure specific prerequisites, this link is version-specific, change to the appropriate version of OpenShift that you choose
- Cloud provider mandatory requirements are to be completed before provisioning the cluster
- The default cluster provisions 7 instances which are a little high on the CPU and Mem. Below in the blog, you can find steps on how to bring down the default infra count. Along with the 7 instances, there are other 20+ cloud components that get provisioned. If you are cost-conscious you must destroy the cluster once you are done.
- Choose the right OS on which you plan to download the installers
- Select the appropriate version, choose a stable version
- If you plan to install software’s like IBM Cloud Pack for Application or IBM Cloud Pack for Multi-Cloud management, select the compatible OpenShift version
- Download the pull secret and store it in a safe location as the same would be used later
- Download your preferred version of installer from install location
- Extract the installer with $ tar -xvf installer.tar.gz
- Ensure that the local user has the “.azure” folder created with Azure specific details in a file named “osServicePrincipal.json” with details as:{“subscriptionId”:”XXXXXXX”,”clientId”:”XXXXX”,”clientSecret”:”XXXXX”,”tenantId”:”XXXX”}
- Run the command from the same directory which has the installer with the command $ ./openshift-install create a cluster
- Provide the inputs as in the example below:
? SSH Public Key /home/user/.ssh/cluster-ad7e-key.pub
? Platform azure
? Region useast (ensure that the region has enough capacity in terms of vCpu as gathered from step2)
? Base Domain sandbox902.opentlc.com (registered domain name in Azure)
? Cluster Name cluster-ad7e
? Pull Secret [? for help] (as downloaded in step 8)
Customizing Installer Provisioned approach
Below are steps for customizing the installer approach:
- Steps 1 to 11 remain the same as the Installer provisioned approach.
- Once the Installer has been downloaded create the configuration file and customize the cluster according to your requirement.
- Run the command
$ ./openshift-install create install-config –dir=<installation_directory>
command would download “install-config.yaml” file into the installation_directory which can be used to customize the cluster. - More details on customization can be found in customizing the cluster. An example of customization would be the count of worker nodes that you would like to provision.
- A folder by name “installer_files” gets created which has all the configuration files.
- Removing the cluster from cloud provider UI would be a cumbersome task, as there are 20+ resources that get created. In order to perform a clean destroy, ensure that the files within the “installer_files” folder are intact and the metadata.json is present. Run the command
$./openshift-install destroy cluster –dir=<installation_directory>
User Provisioned approach
With user provisioned approach you build the cluster on your own infrastructure. Building the infrastructure can be automated using IaaC (Infrastructure as a Code) with the language of your choice (ARM, CloudFormtaion, Terraform) targeting your platform.
At OneDeliver we have an automated pipeline which builds the cluster targeting Azure, AWS, IBM. For requirements around user provisioned cluster kindly reach out to amarjeet.c.singh@capgemini.com.

 English | EN