Let’s set the scene – you’ve spent countless days on preparing training data, training your AI model, and testing it. You’re finally satisfied with the result, but the dreadful question comes to mind – how do I share my work with others? Building an application is the answer, however, this potentially costs time, effort, and requires you to know a thing or two about design to create an app that captures users’ attention. This is where Streamlit steps in.
Streamlit is an app framework that ensures effortless and streamlined application development, specifically tailored for machine learning and data science. I have personally used it a bunch of times and it works great. Keep reading to see some examples and a quick tutorial on how to get started.
A bit of history
When Streamlit first came around in late 2019, everyone was pleasantly surprised that is wasn’t another framework for data management, but one for data-driven applications. This fueled its uniqueness, together with the fact that it was open source and created by a team of data scientists that met working at Google X – Amanda Kelly, Thiago Teixeira, and Adrien Treuille. In their words, Streamlit was built out of the need for powerful apps that can be deployed by data scientists themselves with low code and high customizability, making going from scripts to apps a joyful alchemy.
Streamlit API references
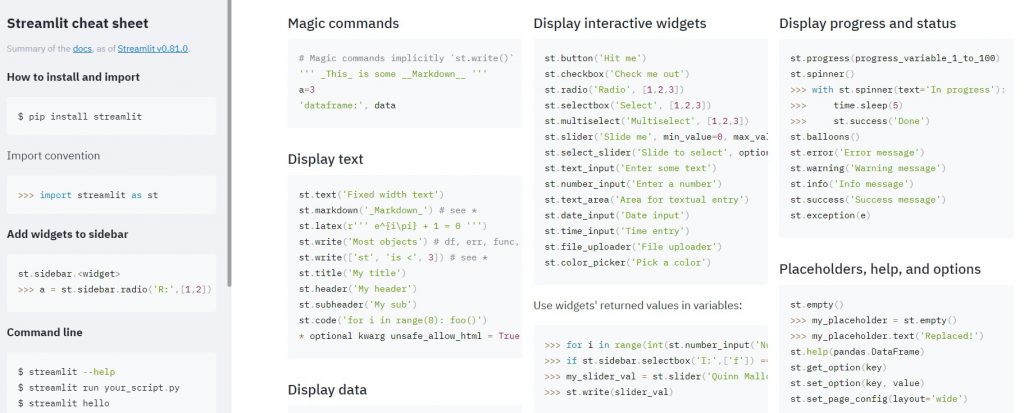
Let’s cover the basics first –Streamlit comes with a plethora of API references to cater to your every need. They allow for quick usage of different Streamlit methods.
Examples of some commonly used API references:
- Display text, with supported latex and markdown for easy formulae display.
- Interactive widgets to give life to your app, like button, select box, multiselect and more.
- Progress and status, super useful for heavy operations so the user doesn’t get annoyed waiting for the result of the model to pop up.
- Optimize app performance. Cache objects in memory to prevent the app from rerunning from the top and making it inefficient and slow.
The API references are easy to use, but here is a cheat sheet to make it even easier!
Streamlit components
With Streamlit’s popularity growing exponentially, their team got to a clever idea of launching Streamlit components. The components allow for seamless sharing of chunks of Streamlit app functionality, which is extremely useful for quick app development.
This clever idea led to a growing collection of Streamlit components built by the users, which can be accessed here. An example of some interesting components would be:
- Html and iframe, which allow for input of a custom piece of html5 code, or, in latter, input of a URL that displays an entire page. For example, if you are no stranger to topic analysis, you probably are familiar with the web based LDAvis library. To display the output of it, you can use the html component (output of LDAvis is an html page, save it to local folder and unpack with the component).
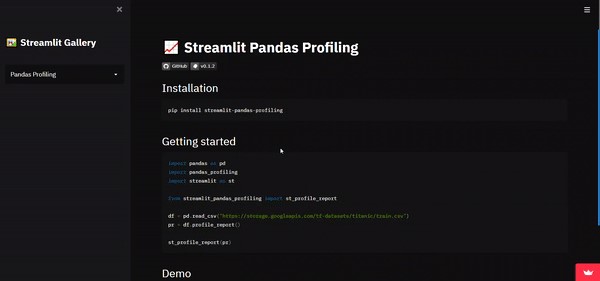
- Pandas profiling, an extremely useful EDA report library optimized for embedding in Steamlit apps. If you are interested in reading what pandas profiling can offer, I encourage you to read their documentation.
- SpaCy, this component contains various SpaCy building blocks ready for usage in Streamlit apps. These include named entities, classification, semantic analysis, and more functionalities that every NLP nerd would love.
- WebRTC, a powerful component which allows you to open a camera through the Streamlit app and have real team video streams. This is great for building real time object detection apps but can also be used for taking pictures with some minor adjustments. If you are curious about the latter, read on!
The components’ mission can be twofold, to either communicate to the browser (static components) or send data back from browser (bidirectional components). For example, the html and iframe components are static, since they only serve the content, while WebRTC is a bidirectional one, sending data from browser to internal state and back to the browser.
Finally, you can build your own components and share with the community by following some easy steps.
Streamlit sharing
The awesomeness doesn’t stop at the components – Streamlit alsooffers a free of charge server, making it easy to share your apps with the world.
The server offers 1GB of RAM, CPU only, but with an option to contact the Streamlit team if you have an outstanding use case and need more resources. You need to sign up for the server and should reserve a couple of days of wait for the approval. Once approved, your GitHub account will be linked to Streamlit and you can easily deploy your app following the instructions here.
If you are not satisfied with the Streamlit server and want to use another one, that is no problem. You can deploy your app on Heroku, AWS or Google.
Examples
There are countless Streamlit apps out there, but here are my personal favorites:
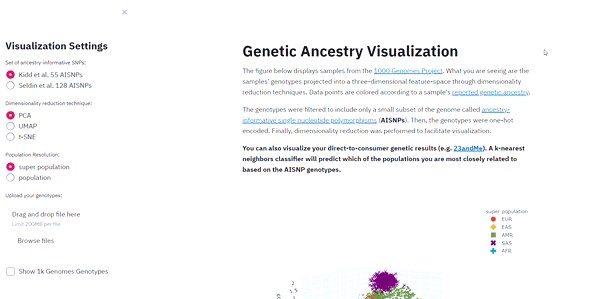
- The genetic ancestry visualization app where you can visualize your personal genome data into 3-dimensional feature space. The app not only visualizes, but also predicts users’ genetic ancestry using a k-nearest neighbors classifier. The app is deployed on Heroku.
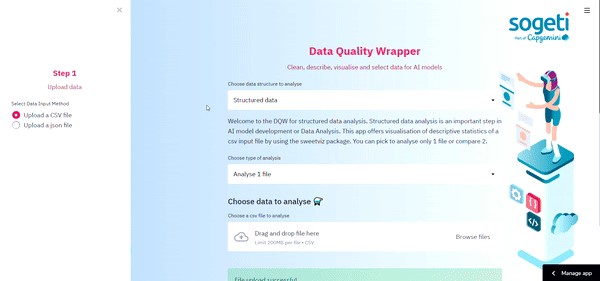
- The data quality wrapper by Sogeti NL. This app addresses the problem of automated training data quality assessment for unstructured (text) and structured (tabular) data. Both include visualization of EDA results and the unstructured data part of the app also offers preprocessing of input data.
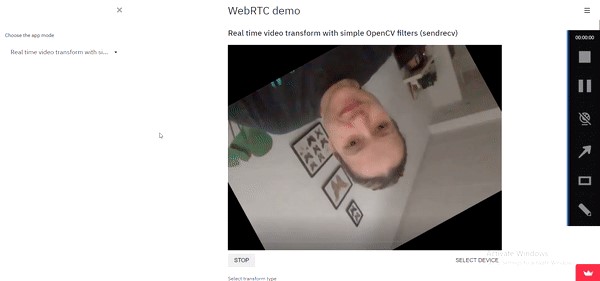
- Any app by user whitphx, the author of the WebRTC component. One of them is the comprehensive demo on the said component, including real time object detection, style transfer and more.
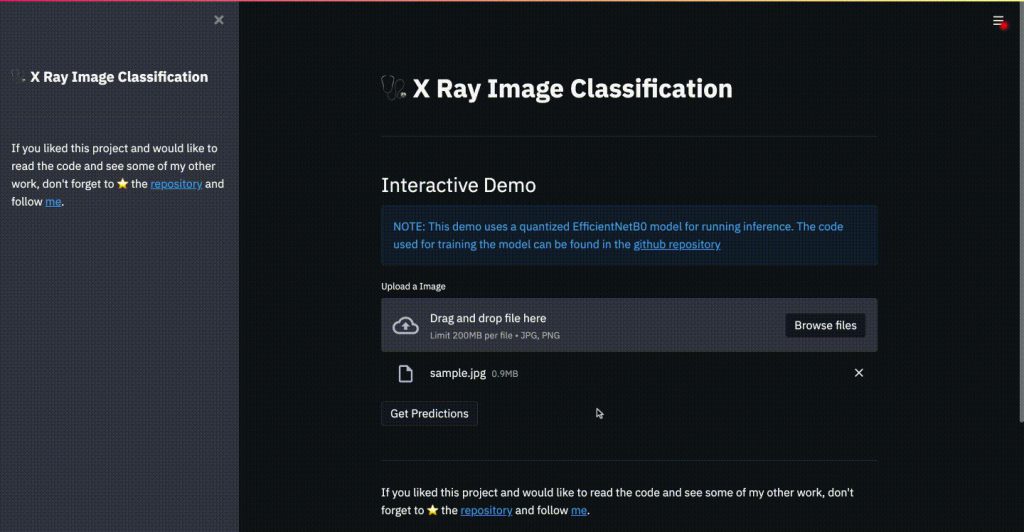
- X-ray image classifier using CNNs, an impressive app that leverages CNNs for X-Ray image classifixation, with a comprehensive deepnote notebook explaining how to get a tensorflow model up and running on Streamlit (amongst other things).
Tutorial – TFLite object detection app
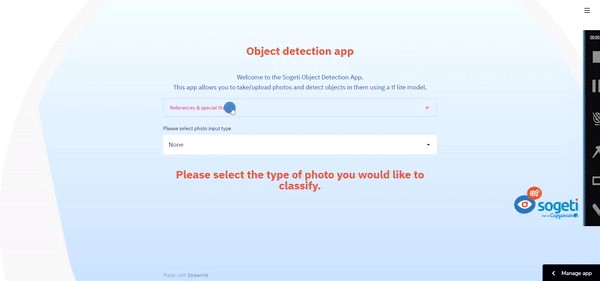
In this tutorial, I will guide you through the steps I took to deploy a pre-trained TF Lite object detection model in Streamlit and use it on uploaded images or images passed from the WebRTC component. The code is available here and the deployed app here.
First steps
First thing’s first, install required packages. I recommend creating a virtual environment first. For windows, you should run the below lines in your terminal after cd-ing to the adequate directory.
py -m venv env
.envscriptsactivate
pip install streamlit streamlit_webrtc opencv-python tensorflow
Create a python script called web_app.py and import packages. This will be our main script; the final three lines are helper scripts holding design, webrtc and object detection functions which you can find in my repository linked above.
# import main packages
import streamlit as st
from PIL import Image # PIL is used to display images
import os # used to save images in a directory
# import script functions
import object_detection as detect
import snapshot as snap
import helper as help
Let’s go into more details of the helper scripts now, then we will come back to the web_app.py setup in final step.
Snapshot component
You can download the script from my repository. This is the script where we place all functions related to the snapshot functionality of the app, which allows the user’s browser to use the camera and take photos. In the script, we:
- Call required packages.
- Define the main function called streamlit_webrtc_snapshot():
- First, we define the client settings. These are required for the app to run on streamlit sharing. If you’d like to support audio transmission, you can set Audio to True.
- Define video transformer class for snapshot functionality.
- Call streamer – pass the client settings and video transformer class.
- Add option of taking snapshots. In case the snapshot button was clicked, convert the input image to output and pass to the app.
Object detection
The object detection model is a quantized (compact) tf lite model. The reason we use a quantized model is better runtime of the app, however, this comes with a downside – quantized models have a lower accuracy. The model and functions we use for this portion of the app are taken from sayakpaul’s google colab (with minor adjustments). As the point of this tutorial is to show how to deploy these models using Streamlit, I will not go into the details of object detection or tf lite models. In case you are interested in these details, please refer to the comprehensive google colab notebook mentioned above.
Create a folder called final_model and place your tf lite model of choice, along with the labels there. Additionally, get the object_detection.py script containing all relevant functions from my repository. In the script, we:
- Call required packages.
- Define display results function:
- Gets the model details, input image path, preprocesses the image, feeds to the model and draws bounding boxes on the image.
Design helper script
Personally, I find the app design very important. In the helper.py script, you can find a lot of helpful design functions that are used in the app. In the script, we:
- Call relevant packages.
- Define a couple helpful design functions for unpacking and setting the background, headers and sub text.
Putting it all together
In the web_app.py script, define main function which will include app setup. The app setup includes:
- Design setup:
- Page configuration and background.
- Header and app info.
- Main app functionality:
- Loading TF Lite model details.
- Select box for type of photo to be fed into the model.
- In case option is set as ‘Take photo’, we call the streamlit webrtc component, write photo, read it for the object detection model and display results.
- In case option is set as ‘Upload photo’, we call the streamlit file_uploader API, write photo, read it for the object detection model and display results.
Test and deploy
Test if your app works. You can do this simply by running the following line in your command line:
streamlit run app.py
This should open your app on local host where you can try out the functionality.
When you are satisfied with the app, you can click the deploy on Streamlit sharing button. Please note:
- You need to have a Steamlit account for this step.
- Your code needs to be pushed to a public GitHub repository.
- Your code needs to have a requirements file. A quick side-note here, the open-cv package is known to create some issue when deploying on Streamlit sharing. To bypass, replace opencv-python with opencv-python-headless.
Once you meet all these prerequisites, you can deploy your app by entering the repository, branch and main file name (in our case – web_app.py). And, voila, you have an app you can share with the world! One final perk – this app runs on mobile as well.
What is next?
Some nice further reads would be around app runtime optimization. Streamlit provides a caching decorator (st.cache) for apps that handle large amounts of data. Also, with the latest release as of the date of this blog (0.84.0), Streamlit provides Session State for storing information across app interactions.
I hope this blog post has piqued your interest and showed you what Streamlit can do – improve your workflow and have a significant business impact in your company due to the effortless app deployment for multiple use cases. Be on the lookout for more Sogeti Streamlit apps like the ones I showed you in this blog post and reach out if you’re interested in more information on our workflow!
This blog has been written by Tijana (Tia) Nikolic

Tijana (Tia) Nikolic | Senior Data Scientist | Netherlands
Tia is a part of the Data Science CoE Team, where building innovative products with quality and ethical considerations is close to heart. Her mission is making an impact and giving back through use of technology. She holds the Young Sogetist of the Year 2020 and Innovation of the Year 2020 title for ADA. Master’s degree in biology and previous experience in marketing ensure a multi-disciplinary approach to any challenge.

 English | EN

