 English | EN
From linters to git hooks, discover how we got the best out of modern dev tools to create a smoother experience for frontend developers while maintaining high quality standards.

The only purpose of this article is to share our experience trying to optimise our frontend developers’ experiences using different processes and tools. Each company has its own constraints and one cannot pretend to tell you what you must or mustn’t do in your environment.
Our philosophy at SogetiLabs
We work with many young experts and at some point we needed to automate our code quality processes in order to scale without losing maintainability on our projects.
By using formatters, linters and some other tools we managed to help developers learn our best practices quickly and nicely.
Prerequisite
This article approaches Javascript projects, so it will obviously be more instructive for you if you already know basic Javascript.
If you want to read this article as a step-by-step tutorial:
- You should have
yarninstalled - You should initiate a git repo on your local machine correctly configured with a remote git repo
Let’s start from scratch
Let’s start with a brand new project and configure all our favorites tools. This new project will be a very small and simple Next.js app (actually it could be any kind of react app using typescript).
Create a new Next.js app with typescript by opening a new terminal and running one of these commands:
npx create-next-app@latest --ts
# or
yarn create next-app --typescript
# or
pnpm create next-app -- --ts
Also we’ll be using Scss in this project so we’ll add sass right now with:
yarn add -D sass
Git Hooks
First, let’s override some git hooks using Husky to keep our git repo clean from the start.
Husky is a zero dependencies and lightweight library that lets us override all git hooks. Open a new terminal at the project’s root folder and run one of the following:
npx husky-init && npm install # npm
#or
npx husky-init && yarn # Yarn 1
#or
yarn dlx husky-init — yarn2 && yarn # Yarn 2
I prefer to use yarn, so I’ll stick with yarn for this article but feel free to use your favorite package manager.
It will setup Husky and create a default .husky/pre-commit script file configured to run npm test before you commit. To add another hook you can use husky add <git-hook name> <script command> but we will come back to this later.
When you will test your hooks scripts later, if you get this error “The ‘.husky/
<target-script-file>’ hook was ignored because it’s not set as executable”. You just have to run achmod +x <path/to/target-script-file>to fix the error.
Check the code before each commit with the pre-commit hook
We will edit this pre-commit script to format the code and check it with linters before committing but we don’t want to run it on all files every time we commit just a single file. To do this, we will replace the npm test command to use lint-staged which will helps us target staged files only. But first, let’s setup Prettier as the formatter.
Stay consistent with Prettier
Prettier is a very famous opinionated code formatter. It has the advantage of coming up with a popular configuration by default.
Start by installing it with yarn add -D prettier in the root folder, then in the same folder, create a .prettierrc config file and copy paste this code:
https://medium.com/media/328441e0e44d6bb09c89f64399e225c6Our favorite prettier config
Prettier has other options you can edit, if you want to know more about these options you can find them here.
For VSCode only
A very nice VSCode feature we like to use is the formatOnSave you can enable in your VSCode config. But we want to make sure every developer in our team has the same VSCode config so that each one uses the same formatter and his code is also formatted when he saves his work.
Create a .vscode folder at the project’s root, and add a settings.json file in this new folder. Here you can setup the project desired configuration for VSCode that will be applied to everyone as this will be versioned in Git. We chose to use this light config, but you can setup more:

The first line will set prettier extension as the default formatter, but the developer must have prettier extension installed for this to work.
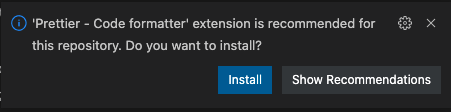
We can’t force VSCode to install a specific extension, but we can do a recommandation to the user. To do so, add an extensions.json file in the same .vscode folder and add the following code:

Now if Prettier is not already installed, VSCode will recommend the Prettier extension to the user.
Keep it clean with Linters
The most famous linter used for Javascript or Typescript is ESLint. If it is not already installed in your project, you can install it with yarn add -D eslint, but it should be already installed for projects created with create-react-app or create-next-app .
At SogetiLabs we like to use the SonarJs plugin for eslint to improve code quality and readability. It doesn’t replace a complete SonarQube configuration but it is a first filter on bad code practices directly in the IDE. If the code isn’t compliant with Sonar rules, it won’t let you commit it thanks to our future Husky configuration.
If you’ve never heard about Sonar, you can take a look at the project’s website.
To add this sonar eslint plugin you just have to add it like any other yarn package with yarn add -D eslint-plugin-sonarjs . Then we have to extend eslint configuration to use SonarJs plugin. Open the .eslintrc.json file (or any file you’re using to setup eslint config) and add "plugin:sonarjs/recommended" in the extends array. For a basic next project, it looks like this:

StyleLint
Stylelint is a linter dedicated to StyleSheets. You can add it with yarn add -D stylelint and configure it by creating a .stylelintrc config file in the project’s root folder:
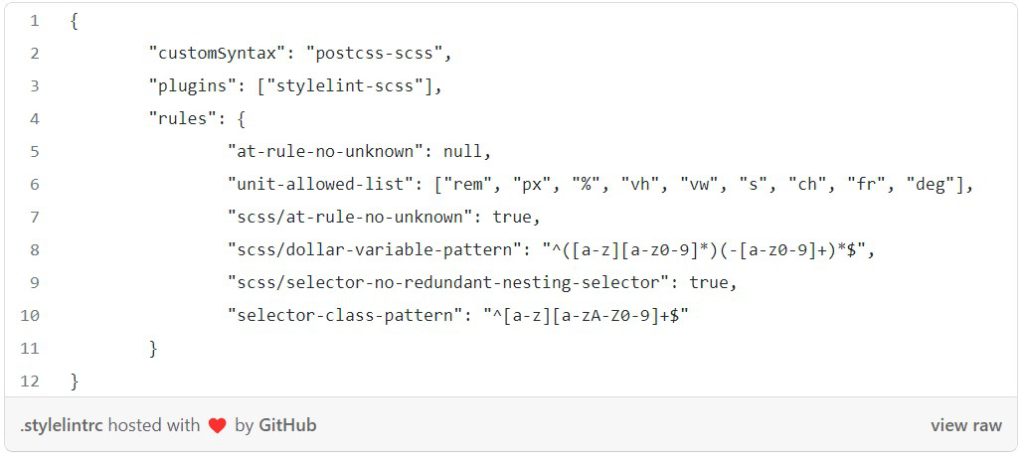
Our stylelint configuration at SogetiLabs
As you can see in the above config, we use a stylelint plugin for scss. For this config to work you need to install the plugin with yarn add -D stylelint-config-standard-scss
Auto Linting with lint-staged
Now let’s add lint-staged to our project using yarn:
yarn add -D lint-staged
Let’s open this Husky pre-commit script file and change its script into this:

Now every time we run the git commit command, lint staged will run. We can configure lint-staged to specify what to run for each kind of staged files. Create a .lintstagedrc config file like this:
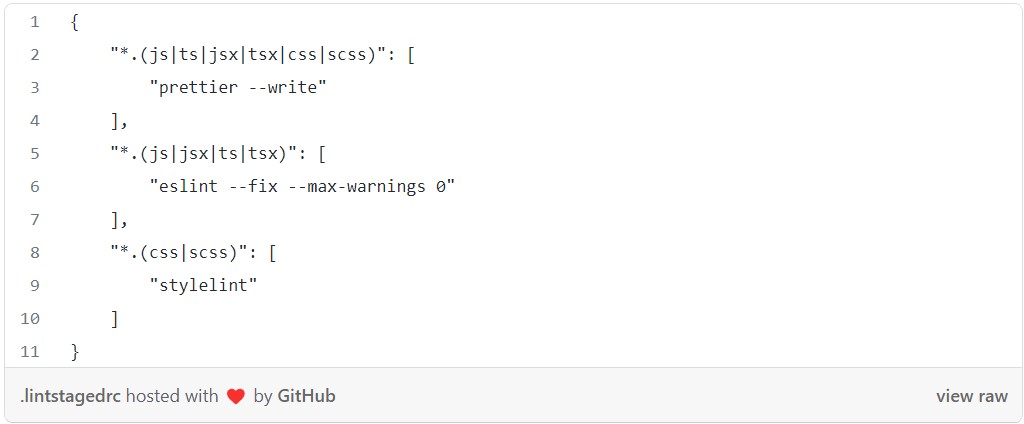
Here you can see we’re running prettier to format all staged files, then eslint will try to fix fixable errors and we also add the —-max-warnings 0 flag to prevent any warning in the committed code, and finally stylelint will check that there is no errors in our style sheets.
Make sure
prettier,eslintandstylelintare correctly installed or it won’t work.
Clean commit messages by overriding the commit-msg Git hook
Commitlint lets us verify that our commit messages follow a certain pattern. Let’s add commitlint to our project using yarn add -D @commitlint/config-conventional @commitlint/cli .
At Sogetilabs we decided to stick to the conventional config but you can use another config. To setup the conventional config, create a .commitlintrc file in the root folder and add the following line:
{extends: [‘@commitlint/config-conventional’]}
Now we just need to add a git hook using Husky to make sure commitlint is ran on every commit. To do so, run :
npx husky add .husky/commit-msg "npx --no-install commitlint --edit $1"
You can test everything is working correctly before moving on to the next step by committing your work with a message that doesn’t match your chosen config, it shouldn’t let you commit.
Enforce your Git Workflow conventions before pushing code.
Validate branch name
Each project/team has its preferred git workflow and naming conventions. At SogetiLabs we work on a feature base workflow, with one branch for one Product Backlog Item (PBI). We have four different items that can lead to a Pull Request and therefore a branch:
- User Stories for new features
- Changes for features already developed that we want to change or improve
- Defects for bugs we need to fix
- Technical Debts for code quality improvements.
validate-branch-name is a package that will verify that our branch name matches a certain pattern. We’ll run it before every git push action using Husky. Start by adding it with yarn add -D validate-branch-name , then add the pre-push Husky script by running :
npx husky add .husky/pre-push "npx validate-branch-name $1"
By default, validate-branch-name will use the following pattern:
^(master|main|develop){1}$|^(feature|fix|hotfix|release)/.+$
But you can customize it to fit your needs. At SogetiLabs we changed it to match our PBI types. In a .validate-branch-namerc , in the root folder, we’ve added these couple of lines:

View raw
As you can see, we want to make sure the branch is either named develop, demo ,test ,master or it has to be in a folder named after one of the PBI types us, change, debt or defect . Then the branch can have any name the developer want, but you could follow the same pattern principle to enforce a branch name pattern.
To go further..
Instruct practices with Commitizen
Now that everything is setup to keep our repo as clean as possible, we could argue that this makes a lot of rules for our developers to learn in order to respect this conventional commit format. So let’s help them become good Commitizens.
Run yarn add -D commitizen to add it to the project then initialize it with npx commitizen init cz-conventional-changelog --save-dev --save-exact
This last command creates a package-lock.json that you can delete if you use yarn.
Now you can add a new "commit” script to the package.json :
// package.json
{
  "scripts": {
     // ... other scripts
     "commit": "cz"
  }
  //...rest of the package.json
}
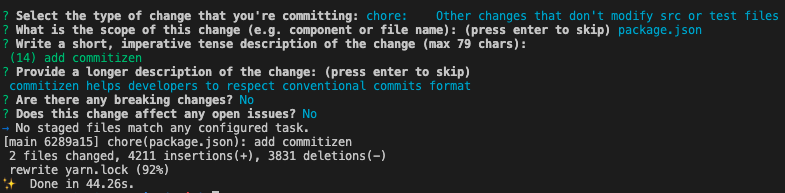
Now when you will run yarn commit Commitizen will guide you through the writing of your commit message to help you follow the conventional commits guidelines. Don’t forget to stage your changes before running Commitizen as it only guides you through the commit step.
Semantic Versioning made easy
Standard version is a package that enables us to easily update our project version using semver while keeping track of changes in an automatically generated CHANGELOG file. Standard-version will set the new version according to the commit messages you wrote, it knows how to interpret breaking changes, fixes and new features to set the right version number that will respect the semver pattern: MAJOR.MINOR.PATCH
Lets add it with yarn add -D standard-version , then add a new release script in your package.json :
// package.json
{
  "scripts": {
     // ... other scripts
     "release": "standard-version"
  }
  //...rest of the package.json
}
For out first release, we don’t want standard-version to bump the version number so we should run npx standard-version --first-release . Then for the future releases you can run the script we’ve just added with yarn release .
You should have something like this in your terminal:
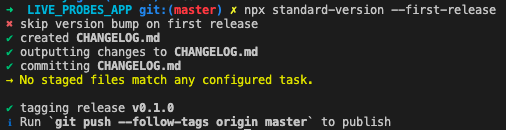
Now you should see a brand new CHANGELOG.md file in the root folder. Standard-version has also committed these changes and added a git tag. You can now push it by running the provided command git push --follow-tags origin master .
Standard version has many config options you can use to customize the changelog (e.g. you can customize url pattern so it correctly points to your remote git repo pages). You can read more about standard version features and config options here if you want.
Conclusion
Thanks to all these great tools, you should now have everything setup to enforce your code quality best practices to your developers team.
These tools don’t solve every code quality issues but they help to clean the code at the beginning of the coding process and to learn from our mistakes in a nice and instructive way.
I hope you’ve learned something reading this article, don’t hesitate to give your feedbacks or share your own experience with this kind of dev tools in the comments.