Setting up your CI/CD can be either a lot of fun or terrible, depending on your background and affinity. But either way, it’s an important part of any modern (development) team, and a key skill to master. So today I’ll share some key skills and concepts, hopefully, to get some people up and running. I’ll use the Azure DevOps multistage pipelines because of their ease of use and flexibility, but the concepts apply to other products as well.
The basics
One reason I like the multistage pipelines is that you store them next to your code, in a yaml file. This means you can keep it in sync with the software you’re deploying, including edits in feature branches.
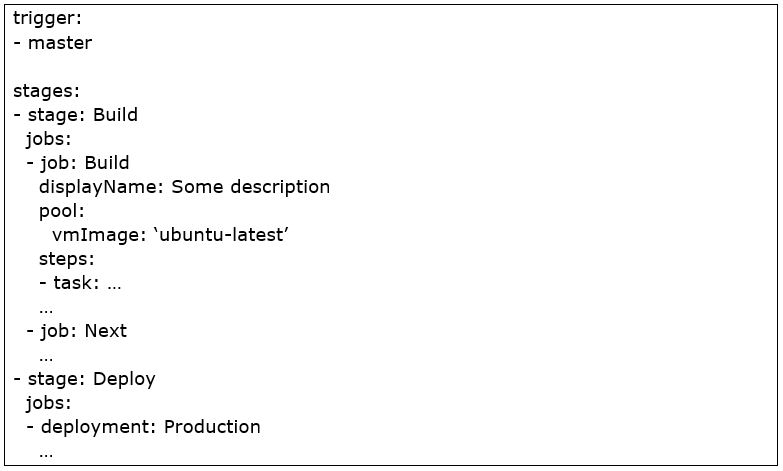
Your main elements to define are:
- Trigger: the trigger on which to act, such as directory, branch, or time.
- Stages: Logical grouping of jobs that need to be executed together, conditions such as approvals are evaluated between stages when you set them. Think of Build, Test, Deploy or Develop, Test, Acceptance, Production depending on your workflow.
- Jobs: Each job can be executed on an agent, a job typically groups by technical constraints. One job can consist of several steps that need to be executed on one machine in one run so it can save and update files for the next step to pick up.
It typically looks like:

The agent
Look at the agent as a server that will execute one job. Microsoft provides a number of agents for jobs that need to run on Windows, Linux or Mac. Details on them can be found on https://docs.microsoft.com/en-us/azure/devops/pipelines/agents/agents, including a list of all the software and versions installed on those images.
If you want more control you can host your own agents and connect them in Azure DevOps. This can be especially useful for either being in control of the costs of when you need an agent in a specific environment such as a secured network or still need to do on-premise deployments.
Microsoft provides tasks for things we generally need a lot, think of it as templates so you don’t have to remember specific commands. This can range from database deployments, builds, run unit tests, deploy an ARM template to a resource group in Azure. Go through the list to find them all, and if it’s not enough the marketplace offers many more – I typically add the sonarcloud steps as a rule.
Special attention should be given to PublishPipelineArtifact and DownloadPipelineArtifact. These two steps allow you to prepare artifacts in one job (e.g. building the software) and make them available in another job (e.g. deploying software on the test environment).
And for all else, use the script tasks.
Fun and frustration with Node.js
One thing you will need the script task for is working with Node.js. There are many global modules, the agents come with only a minimal set installed. Note that installing global modules can get in the way of security settings on the ubuntu agent due to the location these are stored, so you may have to get creative. As a rule, I try to avoid global modules or even build on a windows agent using bash.
Second, know that npm package versioning is something you need to control if you don’t want to get troubleshooting every week. These days npm has a lock file that records the exact packages installed, so you can share that list with other developers or in this case the agent. Long story short: add your lock file to source control. This works with yarn as well of course.
Node.js and npm are very powerful tools that I use in almost all pipelines, even if it is only to get some tools from npm.
Enjoying dotnet
Another tool I use often is the dotnet cli. It is of course used for dotnet core projects and can be run on each of the platforms.
The first obstacle is when you do unit testing and wish to send the code coverage report to sonarcloud. There is a dotnet test command, which doesn’t provide the correct format. Fixing this is quite a hassle and requires you to build it into your test projects. As an alternative, the ‘classic’ VSTest task can be used, however, it is only available on Windows. My tip is to surrender for now but do it in a separate job, it saves you from headache.
There is a nifty feature in Azure DevOps, which is called Artifacts. It’s a package feed in which you can story Nuget, Npm, Maven, and Python packages. Now if you want to embed this feed for NPM in your own project, most convenient is to add a nuget.config in the root directory.
Now if you want to download some external tool using the “dotnet tool install” command, it references the repository from nuget.config but doesn’t authenticate like it does with “dotnet build” for example, leading to authorization errors.
Now there are no real fixes provided for this issue, I’ve looked. My best solution to this problem after a day of troubleshooting was to go up one directory, run the command when it can’t find the nuget.config and go back. For generating an EF idempotent migration script in the pipeline it looks like this:

Special tools, special skills
Each tool you will use in the pipelines requires its special tricks. These are some examples I’ve come across that either caused a headache or was just fun to do.
Postman and Newman
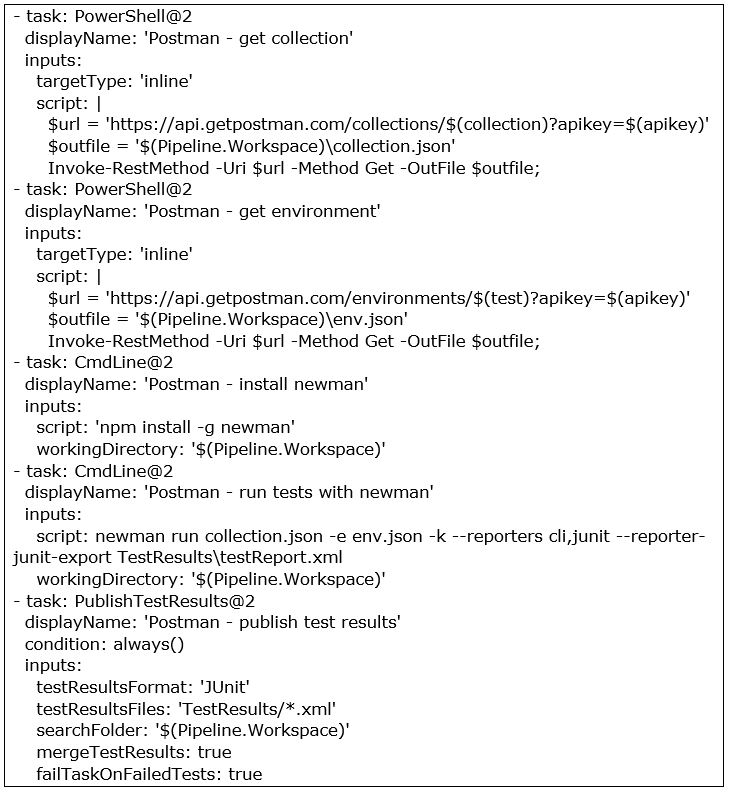
Running integration tests from within a pipeline using Postman. This is one of those examples of a SaaS subscription where you get access to an API for downloading test projects. With many of these types of services you use API keys to get access, and you can download any artifact needed to run the test project. And as it happens, there is a cli for running these projects called Newman, available through npm.
Below you can see this setup. Pay special attention to the condition for publishing test results, you want them to publish even – or especially – when tests have failed.

Nuget prerelease package
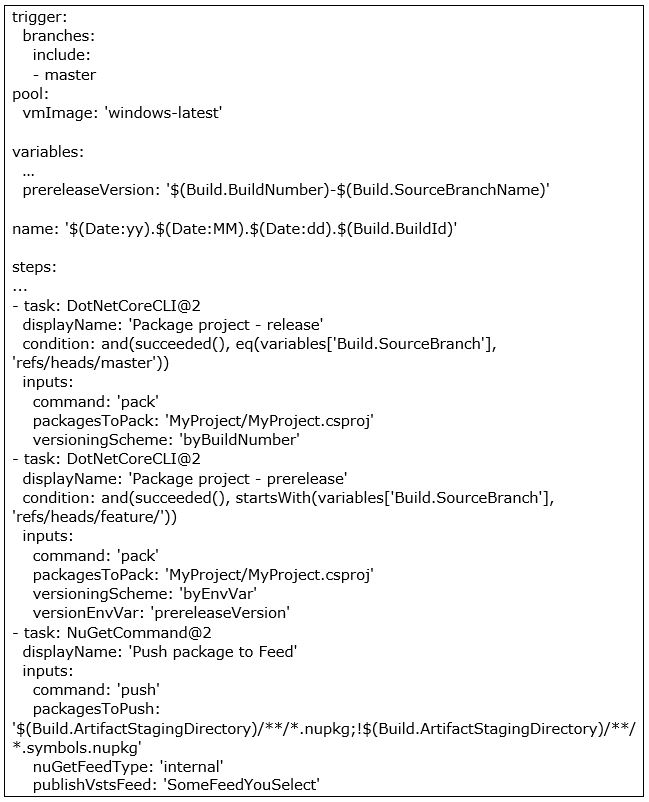
One nifty trick I use when working with nuget packages is to publish prerelease packages when building a feature branch. This way you can speed up your development cycle when you need to do some changes in a package but aren’t ready to go through release cycles yet. It’s a combination of preparing variables and having conditional tasks in your pipeline:

Ethereum and unit tests
When doing a blockchain project with Ethereum, we got to the point where we wanted the smart contract unit tests running in the pipeline – for obvious reasons. For some reason, however, we got stuck on running these for a long time. Turns out, if you include starting Ganache in the pipeline – even as a background process – it hangs your bash session and your tests will not continue. After, well, a lot of time, of hair pulling we finally got it working by doing everything on the windows image using good old CMD.
Full credit goes to my team members who spent the bulk of their time getting to the core of this issue.
And lastly….
Remember all you’re doing is writing a script to run on some machine in some configuration/state, with all the quirks of scripting we all know and love. For those not attuned to scripting, it (finally) is becoming a mandatory skill, without which you’ll be more and more impaired if you miss it. And the more knowledge you have of platforms and their workings, the more it will help you in the long run.
Of course, you’re going to get into those pesky little problems, and sometimes it might seem like it can’t be done. That’s part of what makes doing it so much fun!

 English | EN